Installing TestLog Web Access (CGI)


|
Installing TestLog Web Access (CGI) |
|
|
Setting Up TestLog Web Access
The CGI version of TestLog is included in the normal TestLog installer, if you browse to where TestLog was installed through explorer (default C:\Program Files\TestLog) there will be CGI directory that contains TestLogCGI.cgi and cgiconfig.cfg. These files will need to be placed in a directory on your web server that supports script and executable execution and you will then need to edit the cgiconfig.cfg file to set up the location of the directories TestLog will need and the databases that will be viewable via the web server. TestLogCGI.cgi is a Windows executable and as such will only work on machines running Windows and using Apache, IIS (version 5.1 or higher) or other Windows web servers.
Installing TestLog Web Access on will require knowledge and experience with IIS or Apache and Windows security permissions.
Installing on IIS (Version 5.1 or higher)
In IIS manager, on the Directory Security tab of the TestLog website properties "Anonymous Access" should be enabled and set to the default IIS user. If this is not turned on, depending on what sort of security options you are using, you will have to enter a user name and password before you can access TestLog. The file permissions needed by the databases and temp folders will also depend on your security setup and will have to be changed to allow the same users that can log into the web server to read and write these folders.
There may be some extra steps involved to allow CGI files to be run on IIS, this is covered in this topic.
TestLog can't be used with Version 5 of IIS due to a set cookie/redirection problem (http://support.microsoft.com/kb/176113) that prevents TestLog from setting a cookie correctly when logging in.
Installing on IIS (Version 7)
The above directions can be followed for moving the files to the required locations and setting up the configuration. There are some extra steps that may be required to ensure IIS 7 is setup too allow execution of CGI files. There is an example using the zoom search engine that details this process available at http://www.wrensoft.com/zoom/support/faq_cgi_iis.html., to summarise;
Installing on Apache
Uncomment the "AddHandler cgi-script .cgi" line Add a <Directory> section for the TestLog folder Options Indexes FollowSymLinks ExecCGI AllowOverride None Order allow,deny Allow from all Making sure ExecCGI has been added to the Options line of the section
Note on accessing databases from the web server across a network
By default the user a web server runs as does not have permissions to access files across the network. If your database are not local to the web server and you are adding them to the cgiconfig.cfg file in the form //servername/databasepath then you may need to change the user the web server runs as described in Apache and UNC and IIS and UNC. It is best to get TestLog Web Access working correctly with the sample database on the local hard drive before making changes to allow access to network databases.
Installing Web Access Licence Key
You can either add your key manually to the KEYSECTION part of the CGI config file or by going to the settings menu of the TestLog standalone EXE version and choosing "Install Web Access Licence". This will let you browse to the CGI config file, enter your web access licence key and save the licence key into the config file.
Setting Up Testers - Passwords and Permissions
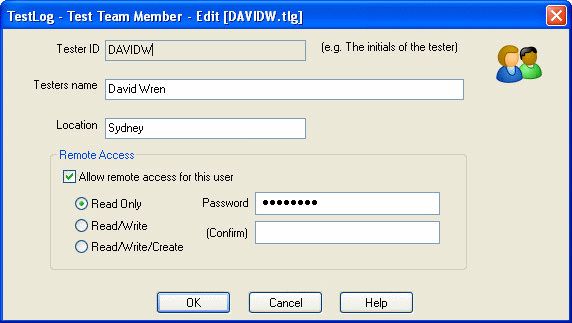
After adding a database to the DATABASES_START section of the config file you will need to set-up passwords for any testers that need access. For each tester in a database there is a "Remote Access" section which can be accessed via the standalone EXE version of TestLog. Once you have enabled this checkbox you can select the level of access granted to the user and enter a password. Now the tester can log into the CGI version using their Tester ID and password. You will need to do this for any database that is added to the databases section of the config file otherwise you will not be able to log in.
The Tester edit dialog as seen in the TestLog EXE version
In the same directory as the TestLogCGI.cgi file is a config file named "cgiconfig.cfg". This file contains the location of image directories, template directories and the paths to the database available to be viewed online. You can edit this file using a text editor like notepad. Lines that begin with the "#" symbol are treated as comments and ignored. Each section uses a keyword between two ":" characters, eg ":TIMEOUT:", with the appropriate value straight after the keyword. Sections that can be a list of values, such as the available databases, use a ":XXXX_START:" ""XXXX_END:" pair to indicate the start and end of the list with each element on a separate line.
Example CGI config file
:IMAGESREL: Path to where the images TestLog uses are stored, this needs to be a path relative to the base URL of your web server so image links can be created in the manner http://webservername/TestLog/tllogo.png. For the above example the images were stored in a directory named "Images" in the htdocs\TestLog directory (for an Apache install). The images needed by the TestLog CGI are located in the "Images" directory where TestLog was installed, these images are also used by the Web export function in the standalone version of TestLog so you should copy them instead of moving them.
:IMAGESABS: Absolute path to the IMAGESREL directory. When viewing reports TestLog will generate GIF files so the reports can be displayed graphically, and need to be stored temporarily. The image will be created in this directory and then linked to using the above relative link. Any images generated by TestLog will be deleted after approximately 30 minutes so they don't take too much space on the server.
:HELPREL: The path where the TestLog help files are located, this needs to be a path relative to the base URL of your web server so html links to the various help pages can be created and opened. The above example has the "Help" folder that contains the help files copied from the directory where TestLog was installed to the "TestLog" directory in the htdocs directory (for Apache).
:TEMPDIRABS: The absolute path of a directory on the server that TestLog can use for storing temporary files such as the session file for user logins.
:TIMEOUT: The session timeout value in minutes, once a user has logged in and not had any activity for this length of time they will be forced to re-login for the next action they take, this can be a value between 1 minute and 1440 minutes (24 hours), if a value outside this range is entered the default 60 minutes will be used.
:TEMPLATEABS: The location of the Templates directory. This need to be an absolute path as the template files are opened by the TestLog CGI and their contents used to create the displayed HTML. The example uses the default directory where TestLog was installed, C:\Program Files\TestLog, if you move the Templates directory to the same folder as the images and help folders remember to update this section.
:DATABASES_START: (:DATABASES_END:) Absolute paths for each database to be accessed via the CGI up to a maximum of 50. If you are using Apache and entering UNC paths to databases on network shares please see the Apache and UNC section below, there is also a section for IIS and UNC.
:KEYSECTION_START: (:KEYSECTION_END:) The list of purchased licence keys, each time you purchase a key and add it to the list it will increase the number of simultaneous logins. Do not replace old keys with new ones as they are cumulative, so if you purchase two licence's you should have them both in this section.
:ADDBUGPATH: Optional tag, used for linking to an external bug tracking tool, web access module equivalent of the Add bug path in the standalone TestLog options, once a path is entered for this a "Add Bug" button will appear on the edit screen for a project test case, next to the Fault Report field. This is only valid in the web access module if it is link to an online tool, eg "http://server/bugzilla/enter_bug.cgi?".
:VIEWBUGPATH: Optional tag, used for linking to an external bug tracking tool, web access module equivalent of the View bug path in the standalone TestLog options. This is only valid in the web access module if it is link to an online too, eg "http://server/bugzilla/show_bug.cgi?".
:VIEWREQPATH: Optional tag, a path to an external tool or web service for your requirements management tool, web access module equivalent of the Requirements Path in the standalone TestLog options, as with the VIEWBUGPATH it is only valid if it is a link to an online tool.
:LOCKTIMEOUT: Optional tag, the time in minutes before a lock file is automatically ignored when editing a file. This should be a large value to avoid ignoring the lock file when the file is still genuinely being edited. By default this is commented out in the provided config so it is not enabled.
:CHARSET: Optional tag, allows the specification of a particular character set. Although TestLog is not a Unicode application this can be useful for non-English languages if characters (like month abbreviations) are not being displayed correctly. For example it can be set to GB2312 to UTF-8 to fix some output problems caused when the web server is running Chinese language versions of windows.
:DEBUGMODE: Optional tag, turns on debug logging for the web access module. The log is written to the directory setup in TEMPDIRABS.
When using UNC paths to databases located on network shares Apache will need to be setup to be run as a user with these permissions. By default when Apache is run as a service it run under the SYSTEM user. This user doesn't have permission to access the network, so any databases accessed by a UNC path, such as \\examplepc\share\database, will fail with an "Access denied" error. See the section "User Account for Apache Service to Run As" in the Apache help docs for more information on setting Apache to run a different user. The correct permissions will need to be set on the machine storing the database to allow the user Apache is now running as to read and write the database files.
Similar to Apache, IIS runs a user that doesn't have access to the network. Rather than set the whole IIS server to run as a different user you can use the application pool to run as different user just for the TestLog installation.
For versions of IIS that have application pools (version 6+)
For versions of IIS without application pools (version 5.1, though this may also work for version 6 and higher as well)
Setting Up Binary CGI Support For A Windows IIS Server
Your IIS server may not be configured for executing binary CGIs. Note that this is not the same as having Perl support. You will need to contact your web host or have direct access to the server to change this by following the instructions below.
First, you will need to access the IIS window on the web server (Control Panel -> Administrative Tools -> Internet Information Services). Next, locate the folder for your website, and select the folder (TestLog) where you will be running the CGI file. Right click on the folder, and select "Properties". Now look for "Execute Permissions" and change the setting to "Scripts and Executables".
If the "Configuration" button is enabled, you can click on it to check if the ".cgi" extension is mapped to an application. If not, then it should be fine for the CGI file to run. However, some servers may have the ".cgi" extension mapped to ActivePerl. This means that your binary CGI would not execute properly when executed, because it gets treated as a Perl script. In this case, you can work-around the problem by renaming the ".cgi" file to ".exe" though this may cause some linking issues when running TestLog.
For IIS 7 there is an example using the zoom search engine that details this process available at http://www.wrensoft.com/zoom/support/faq_cgi_iis.html that can be applied to installing TestLog.
Note: If you are running IIS 6.0 on Windows Server 2003, you may need to configure some extra options to enable CGI (due to additional security requirements enforced in this OS). Namely, you will need to allow the Web Service Extension for CGI in the IIS Manager window.
This can be done from the IIS Manager window, by locating "Web Service Extensions", and changing the "All Unknown CGI Extensions" status to "Allow". However, this would allow any CGI applications to run on the server. If you wish to specifically allow ONLY the "TestLogCGI.cgi" application to run, you should create a new Web Service Extension. Do this by right-clicking in the web service extensions list, and selecting "Add a New web service extension". Enter a name (eg. "TestLog CGI"), and click on "Add". You will have to specify the path to the "TestLogCGI.cgi" file here, and click "OK". Once you have done this, change the status for the new extension to "Allow". For more information, refer to the above link and the Microsoft documentation for Configuring CGI Applications (IIS 6.0).
Troubleshooting - Common error messages and their solutions 404
See a Description of Microsoft Internet Information Services (IIS) 5.0 and 6.0 status codes and HTTP status codes in IIS 7.0 for other IIS error codes and their meanings.
|