Getting Started


|
Getting Started |
|
|
When you run TestLog for the first time, it displays a Startup Dialog, which offers the following four choices.
For the purposes of getting started, you may wish to open the KeyTest database to examine how we believe TestLog is best used, or create a new database for your project and follow the steps in 2.2, Creating a TestLog Project.
A TestLog database consists of one or more Projects, Test Cases, Testers, Configs and Resources. You may create as many databases as you wish, but only one database can be opened at any one time. Projects are created within databases and Test Cases are then added to these projects. There is a brief description of the entities contained in a TestLog database below.
Entity Description Project A TestLog Project typically represents one release of a software product. A TestLog database may consist of many projects spanning several releases of a software product. Certain entities such as reports are generated on a project-by-project basis. Projects consist of one or more Test Suites. For example, you may wish to create one test suite for tests concerned with install and uninstall, and another test suite for user interface tests. Each test suite consists of one or more test cases, which in turn contain test configurations, resources and testers. To learn more about projects and test suites, see Projects and Test Suites. Test Case The Test Case is the main ingredient of a TestLog project. A TestLog test case is analogous to an actual test case, which you will use to test your software product. You may write your test cases within TestLog itself or port existing test cases into the TestLog project. Test Cases are assigned to TestLog projects. A project may contain one or more test cases. To learn more about test cases, see Test Cases. Tester A Tester corresponds to a person who will be carrying out the various tests within the test cases. One or more testers are assigned to each test case.
Test Configuration To learn more about configs, see Test Configurations. Resource
We denote Resource to mean a particular machine or piece of hardware necessary to carry out a certain test case. Generally, resources would be types of computers and devices, which are not readily available and may have to be requested in advance. Resources are assigned to test cases. A test case may contain one or more resources. To learn more about resources, see Resources.
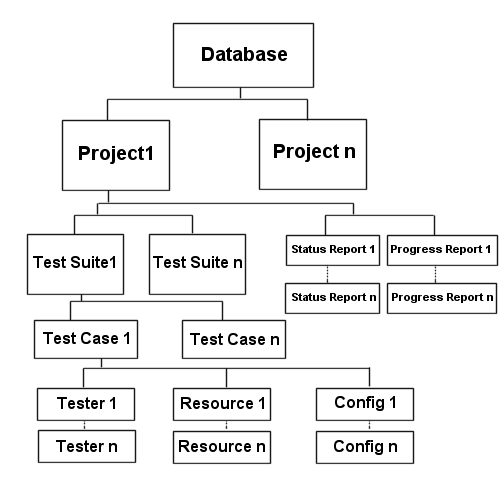 TestLog logical hierarchy
Creating a TestLog Project
Before creating your project, it is recommended that firstly, all testers, test configurations, resources and test cases be created (in that order). These represent entities, which may be used across many projects.
Once you have created the various entities in steps 1 5. You have all you require to create a new project. To create a project, right click on the Projects folder in the tree view and select New project. A project folder automatically contains two sub folders, Project reports and Project test cases. Now simply drag and drop (or copy and paste) the generic test cases into the Project test cases folder. Once you have dragged all the desired test cases, your project is created. You may drag the generic test cases to many different projects. In this fashion it is easy to maintain the same test cases across different versions of your software product.
Now all that remains is to begin carrying out the tests. As you continue through your test cycle you will update each test case with the results of the test thereby tracking your progress. Reports only become really meaningful after some tests have been attempted. A Status Report displays the current state of the project in terms of tests complete, tests failed, tests passed and various data on the time currently taken to carry out the tests. A Progress Report displays a graph of the project since the begin date. It tracks how many tests have failed, passed or not yet been attempted. A Test Case Report is a collection of test cases and their data that match a certain filter. A Test List Report is a list of all test cases from a project matching a certain filter and displayed under headings chosen when creating the report.
|